My Framebuilding setup
FramebuildingThere are countless ways to make a steel bicycle frame and countless tools to help you build it. But tools alone won’t a frame make. A builder needs skill, patience, perseverance, and above all, the ability to improvise. In many ways a spring clamp is more essential than frame jig. With this in mind, when I decided to get back into framebuilding recently, I didn’t want to nor financially could spend a lot on fancy tooling. Instead, I tried to focus on a minimal setup emphasizing accuracy over convenience. Here’s a look at my current setup:
Surface plate and helper tools
Surface plate: If you read any of the framebuilding forums you’ll likely see a trend when some new guy asks whether to get some jigs or a surface plate to start out. 9.9 times out of ten the pros will stress the value of a surface plate. This was the first tool I sought. I got lucky on Craigslist and found a 2’x3′ granite surface plate with bottom bracket post on a sturdy metal stand with casters for $200. I paid $250 to rent a truck with a liftgate to haul it home.
The plate is on the small side. Either the head tube or the rear dropouts will stick off the plate. But it’s proved big enough to do the job.
Alex Meade’s frame fixture set: My one-car garage doesn’t have room for big frame jigs. Instead, I bought the wonderfully compact Meade fixture set for $550 from framebuilder extraordinaire Tim To of Granville Cycles. With this set and the surface plate I was able to build Carrie’s petite touring frame and fork. My friend Scott also built a very large hard tail frame at the same time.
The fixture is designed to be used over a full-sized drawing, but I found that the angles and lengths outputted by BikeCAD were enough to get accurate results. It was however fiddly. Unlike a standalone frame jig, it’s not a set it and go procedure. I was constantly realigning the tubes to each other and checking angles. I have an idea for locking each block into position on the surface plate but haven’t got around to building the pieces yet.
The most challenging part was getting the chainstays set at the right bottom bracket drop. I relied on setting the interior angle between the seat tube and stays, which is easier said than done. Some kind of dedicated helper fixture for this would be a huge time saver.
I was surprised how easy it was to use the fixture for building the fork. I used it to check that both blades were raked the same distance and then to hold the blades into the crown for brazing.
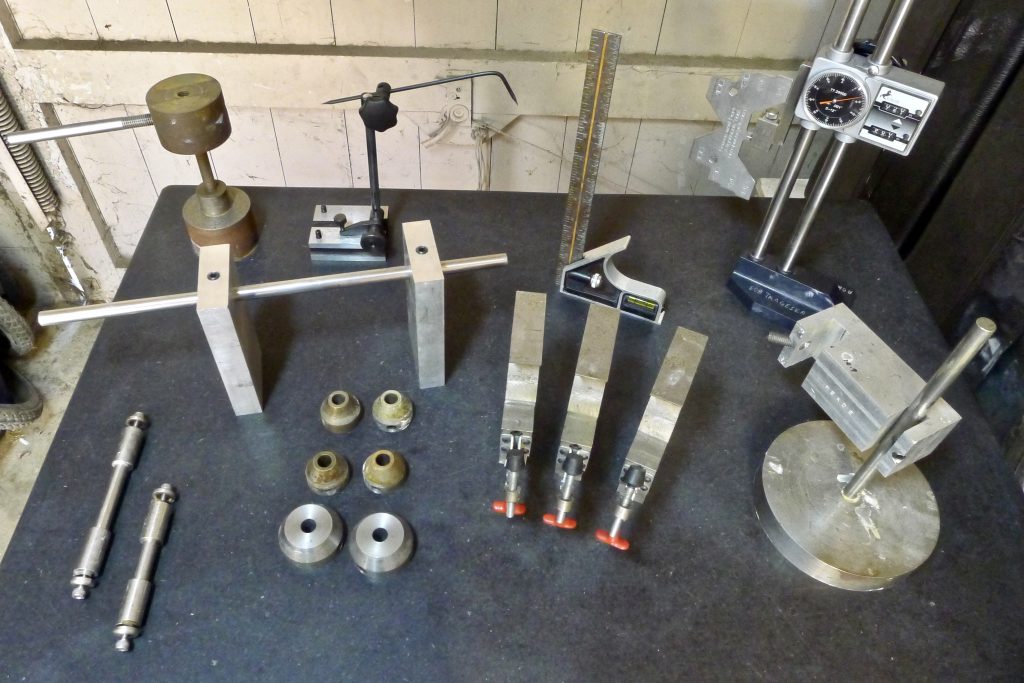
Dummy axles: To use the Meade fixtures you’ll need dummy axles. I bought a keyed 102mm and 137mm from Don at Anvil. They’re slightly wider than standard dropout spec to allow for the natural contraction that occurs post brazing.
Combination square: I have a cheap combo square that I should replace with a machinist’s square, but the thing is lightweight and one less tool to buy. I used one of the Meade blocks on the surface plate to set the blade to 90 degrees from the plate.
Bevel dial caliper: I got this from Shars during round one of my framebuilding career. I assumed it was accurate, but checked it against one of the Meade blocks and it was off by a surprising amount. Not good when this is the tool I rely on for confirming all angles on the frame. After my attempts to calibrate it it is now off by about five minutes. I’d prefer perfection here. The damn blade also comes loose all the time. I’d like to upgrade this essential tool at some point.
Surface gage: The Scratcher is a simple tool for checking frame alignment. I have a cheap one from Shars and it works fine.
Height gage: My ex-machinist friend Rob leant me his really nice Swiss height gage. This is definitely the fanciest tool in my possession. Combined with the fantastic Compass frame alignment tool I’m able to accurately check rear dropout, fork dropout, and front triangle alignment.
The workbench station
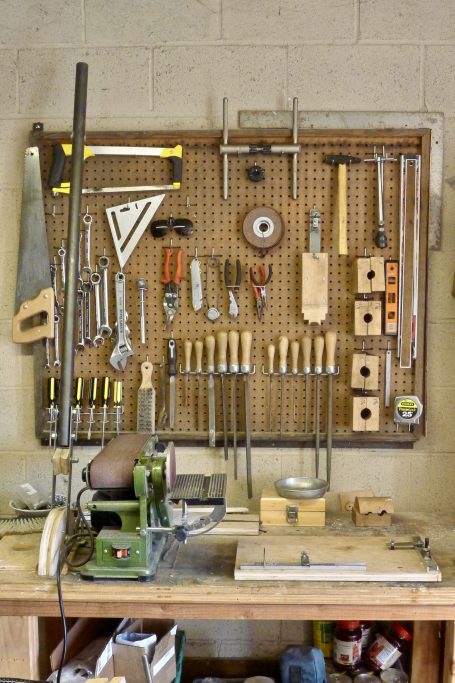
The bench: My DIY workbench is a little rickety and too small. I built it long ago before I knew anything about proper woodworking techniques. Some day I’ll modify it so it’s sturdier and larger.
Vise: The 4″ vise seems small by what I see attached to the professionals’ workbenches, but damned if it doesn’t accommodate my tube blocks and anything else I’ve attempted to clamp in it. It has an integrated swiveling base, which is very handy for brazing on both sides of small items. But the base, even when tightened down to the max, will still slip and flex. I can’t use the vise with my 1/2″ Ridgid tubing bender or my homemade fork blade bender. Otherwise, this is one little champion clamper.
DIY fork blade bender: The form is made from two pieces of 3/4″ shop grade plywood glued together. I routed the groove before sandwiching the two pieces. It has a 4.5″ radius, tight for the lovely last-minute bends seen on the handsomest French randonneuring frames. When I eventually attempt to make a disc brake fork I’ll probably make another form with a larger radius so mounting the disc brake tab will be easier.
The blade tips are secured to the form with a bolt and a piece of angle iron. I’d like to improve this to ensure that the blades bend as close to the tips as possible. The shoe is made similarly to the form: a sandwich of 3/4″ plywood with a routed groove. The lever is a three foot long tube attached to some flat plate steel. I drilled evenly-spaced 1/8″ holes below the form’s groove. An 8-penny nail inserted into one of these holes acts as stop for the lever so I can get consistent bends.
To my surprise the thing actually works. The fork blades bent smoothly and to almost the same rake. Once I improve the blade tip holder the bender should provide repeatable bends.
DIY Kirk fork blade cutting fixture: Dave Kirk is one of the masters in the biz. His fillets are works of art. As far as I know, he also has a pretty lean setup compared to most pros. So when I saw the simple fork blade cutting fixture he uses, I figured heck, I could make one of those, and so I did, and it works perfectly. Thanks Dave!

Belt sander: On a whim I bought a Harbor Freight belt sander. It’s proved to be a great way to grind and shape dropouts and braze-ons, to clean up tube ends, and for general sanding needs. It saves boatloads of time over hand filing. What I’d really like to do though is to build one of those belt grinders that knife makers use. I got to use Dave Bohm’s grinder during his class. I used it for tons of little shaping jobs by switching out the attachments. I can imagine using one to cope tubes too.
Tube blocks: I bought some of Dave Bohm’s tube blocks during my first framebuilding foray. Tube blocks are essential for hand filing, which is my method for coping tubes.
Hacksaw: I replaced my flimsy hacksaw with something much stiffer for less than $20 at Home Depot. It’s impressive how easy it is to make square cuts with a proper hacksaw and sharp 32-tooth blades.
Hand files: The more the merrier. I have a full set of bastard cut round and half round files, a 6″ warding file for slotting, some Swiss pattern needle files for finish work, and some die maker’s riffler files for shaping curves, shorelines, and other tight spots. Hand filing can be tedious. Coping the tubes is the easiest part. It’s finishing the tabbed dropouts or removing lumps of filler near shorelines or around fillets that can get tiresome. I need to improve my brazing skills so I don’t have to spend as much time in cleanup mode.
Rules: A tape measure can be handy for rough cuts, but more accurate work requires good rules. I have flexible steel rules in metric in 6″ and 36″ sizes.
Vernier calipers: At Dave Bohm’s framebuilding class, Dave busted out his 40″ vernier caliper to help us mark the second cuts for our down and top tubes. I’m not sure how other’s accurately make these cuts without one, so I bought one from Shars. This was one of the more expensive items I purchased this time around. It was about $150 with a 20% off coupon.
I also have a cheap, digital vernier caliper for all sorts of tasks. This little tool gets a ton of use and should be in every framebuilder’s tool kit.
Tube benders: To make curvy bridges and a little front rando rack, I found some used Ridgid tube benders on eBay. A 1/2″ and 1/4″ bender do the trick. Many of the pros have Diacro tube benders, which are modular and very expensive, but they allow the builder to make a wider variety of bends. If I were to start making lots of racks the Diacro would be a fun toy. The Ridgid benders however make clean bends with minimal fuss.
Drill press: My benchtop drill press is nice to have but not essential. It’s really better for making fixtures than for framebuilding. Regardless, I love having it for all sorts of random projects.
Cordless drill and bits: A cordless drill is handy, especially when your workshop has only one outlet. I have a Dewalt drill bit set from 1/16″ to 1/2″ and a stepped bit. The stepped bit produces cleaner 1/4″ holes for water bottle bosses in the main tubes.
Automatic center punch: Have you ever tried to drill a hole into a round tube? The bit will take a walk and you’ll announce a few four letter words. The auto center punch is a cheap way to start holes where they belong.
Scribe and layout dye: A scribe and some layout dye allow me to mark my tubes for cutting. The scribe comes in handy for poking at stuff too.
Shop cloth: A roll of 80-grit shop cloth is essential for prep and cleanup.
The brazing station
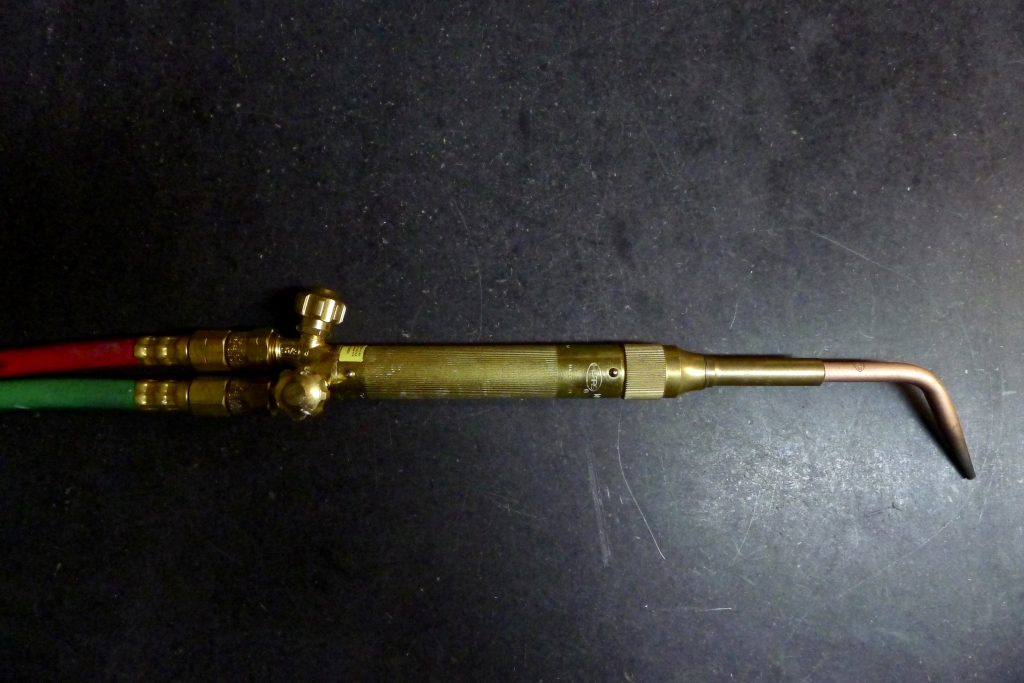
Oxy-Acetylene rig: My friend Scott came through, loaning me his tanks and Harbor Freight regulators, hoses, and striker. I bought a Harris torch handle and a #3 torch tip, a good size for fillet brazing and braze-ons but maybe on the small side for silver brazing the bigger joints.
Bike stand: A folding bike stand is perfect for a small shop. Mine was from Performance many moons ago. It’s seen better days but it still works well for brazing and working on bikes. The key is to set the clamp tension and the post tension correctly so you can rotate the piece you’re brazing to different angles with one hand.
Filler and flux: I’ve always purchased my bronze rods, silver spools, and fluxes from Henry James.
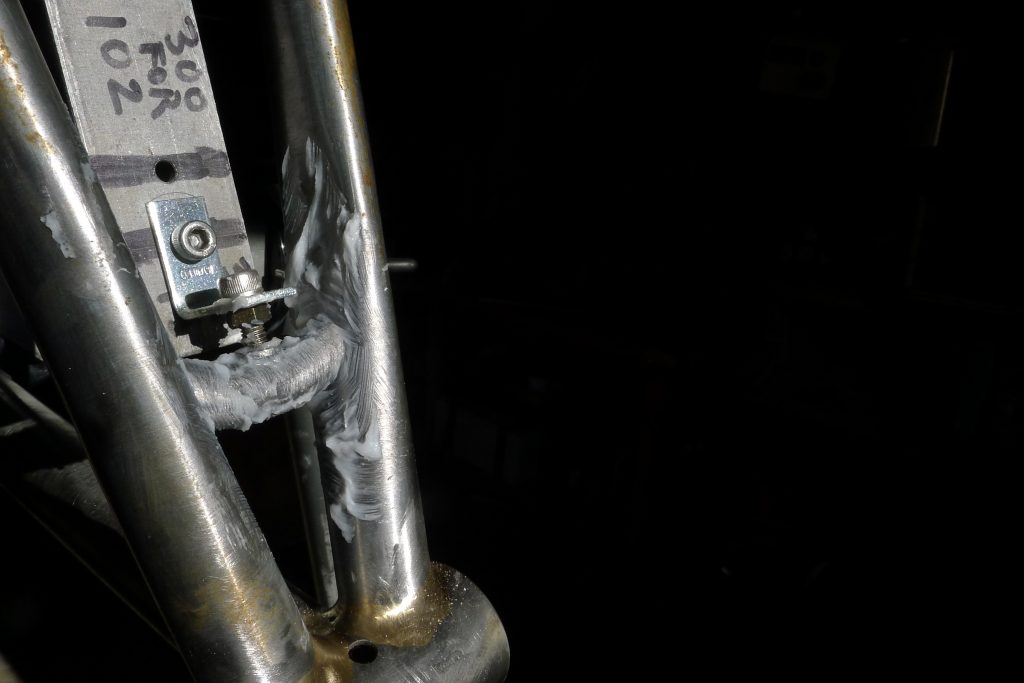
Braze-on holders: Positioning, aligning, and securing braze-ons is surprisingly time-consuming. Most of the time I rely on pieces of scrap steel plate and heavy objects to keep a braze-on from wandering. Spring clamps, c-clamps, and vise grips are also handy. For holding cantilever bosses, I use a simple set of steel plates connected by a threaded rod. The plates have holes drilled at 80mm on center (for cantilevers and v-brakes) and 78mm on center (for Paul Racers).
DIY bridge holder: This one is a unique creation. Since Carrie’s bike is running fenders, I wanted to make sure that both bridges were installed equidistant from the tire. This makes installing fenders easier and reduces stresses on the fender for longer service life. The fixture slips over the narrow portion of the Anvil dummy axle. It has a telescoping steel plate with an angle bracket attached to the end. The angle bracket has a M5 bolt attached to it to hold the bridge by it’s water bottle boss.